Sunday, July 29, 2012

Beef Short Ribs

Confession, I am in love with the beef cheeks cooked in "something something" served at Movida Aqui in Melbourne. Today I am trying to replicate the tenderness of the beef. I am using ribs instead of beef cheeks. Okay, I am old, I forgot the name of the sherry or liquer they used.

So, I bought myself some short ribs from Coles, it has eight pieces of short ribs inside and a packet of sauce. If you have a slow cooker, you should follow the instructions on the packet and let it cooked away for six hours.

IMG_5967

As for me, I don't own a slow cooker. I do have a pressure cooker though. I googled and learned that, yes, there are others who have cooked their short ribs in a pressure cooker. Sweet!!! That's is excellent news for me. I don't have the patience for a slow cooked meal, six hours...OMG! That would be too long! I would die of starvation by then.

So I threw in the pieces of ribs in the pot, and added the sauce. Then I improvised, I chopped some French Shallots and carrots, threw them all in. Then, I poured in, half a bottle of red wine. Err, and drank the other half, while the beef was cooking.


In less than an hour, I opened it up, to have a sneak peek at the beef. It's fallen off the bones already! The boy came out from his room and exclaimed, "Gross! What is that smell?" And then he sprayed some air freshener in his room. Bahhhahhahahaha. It was the smell of the beef cooking in wine. At least I know he won't be touching the stuff... the vino cabinet, that is!

By now, I realised that I could not spell to save my life whilst waiting dinner to cook, I was instagramming and tweeting. Such a multi tasker, aren't I?

I had to open a second bottle; as apparently the short ribs were better drinkers than I. Must be the pressure cooker, it reduces the liquid, you see. So I pour the wine to cover over the beef again and left it alone for another half hour.

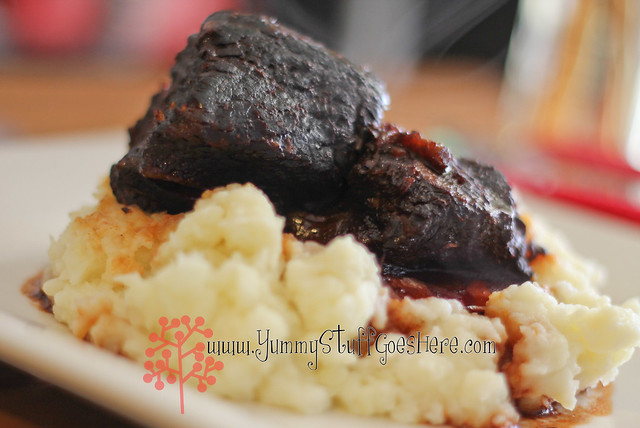
Meanwhile I also baked some veges and made mash potatoes to go with this dish. At Movida, they use cauliflower puree as a bed to sit the beef cheeks on. Today, I am cooking mashies instead of cauliflower, because the boy will eat the mash potatoes and not cauliflower. Wish there is a boot camp that you can send your kids to, and they come home eating all sorts of veges!


Tada..... not Movida Aqui but still super yummy, all up under $20! Not counting the vino, of course :) Now to go feed my face... before I fall off my chair....slurp! Hick!

Sunday, July 22, 2012

Asian Snapper

I love this dish as a child and still do as an adult. My mum likes to steam fish for healthier way of eating. I, on the other hand, likes mine deep fried. Pretty much everything....fried chicken... fried soft shelled crabs, fried fish... etc..And this is why I am fat!


However, for today, I have decided to do a quick fry then baked the fish in the oven. Deep frying is far easier when you have a deep fryer.  Must get me one of those. Just bear in mind that if you do decide to fry, it can be rather sloppy and messy in a wok or pan.

Ingredients
Serves: 4

  • 1 (approx 700 g) whole snapper, cleaned and scaled
  • 1/2 cup fresh coriander leaves
  • 2 tablespoons oil
  • 2 tablespoons fish sauce
  • 2 cloves garlic, minced
  • 1 teaspoon minced fresh ginger
  • 1 French shallots, thinly sliced
  • 2 small red chillies, sliced
  • I tablespoon of kicap manis (sweet soy sauce)
  • 2 tablespoons water
  • 1 whatchamallit of Buk Choy (chinese greens) 
  • I packet of beansprouts
  • I packet of shittake mushrooms

NOTE:
Extra Ginger thinly sliced and fried
Coriander leaves and fresh chilies for garnish
A few drops of sesame oil to sprinkle on dish before serving


Preparation method

Prep: 30 minutes   Cook: 30 minutes

  1. Preheat oven to 190 degrees C.
  2. Line a roasting pan with aluminum foil.
  3. Stuff the cavity of the snapper with the coriander leaves and set aside.
  4. Heat the oil in a large frypan over high heat until it begins to smoke. Place the snapper in the frypan, and quickly brown on both sides, about 1 minute total. Place the fish into the roasting pan, and sprinkle with fish sauce. Reserve the oil in the frypan.
  5. Bake fish in preheated oven until the flesh flakes easily with a fork, 25 to 30 minutes.
  6. Meanwhile, heat the remaining oil in the frypan over medium heat. Fry the garlic and ginger and shallots, removed when crunchy
  7. Add kicap manis and water. 
  8. In a wok, stir fry the Buk Choy, mushrooms and beansprouts on high heat for a few minutes.
  9. Place the stir fried veges on a plate and rest your fish on top of the greens. Pour the sauce over the snapper, and garnish with extra coriander leaves to serve.
  10. Sprinkle sesame oil on the dish. The smell of that alone will get them running to the table.
  11. Serve with jasmine rice.
Happy Eating ;) Just don't look at those fishy eyes and you'll be right!!!


Sunday, July 8, 2012

Fish ball paste

This weekend; after an epic fail in baking, Baking 1: Jackie 0. Feeling very defeated, far worse than when my macaron fail....like seriously guys, how could I get baking a premix wrong??? Pfffttttt! I am officially a baking retard!


So, I've decided to make my own fishballs. The reasons being

  1. I couldn't be bothered with driving to ACT for a Chinese grocery run. I usually buy commercial bulk pack.
  2. It doesn't involved baking. 
  3. It's my favourite snack on stick
  4. It's simple easy recipe, no Science degree required
  5. Oh, have I mentioned? It doesn't require baking, no oven involved!!!
  6. I can have it with my laksas during winter..
  7. And whaddaya know... NO BAKING!!!!!

Preparation time: 20 minutes
Rapid cooking time: 15 minutes
1 lb. white fish (pollock)
1/2 cup arrowroot starch (can be substituted with tapioca starch or cornstarch)
Egg white from 2 eggs
3 ice cubes (about 1-inch square)
1 teaspoon salt
1/2 teaspoon white pepper
Cut up the fish into 1/2-inch cubes. Put all the ingredients except for the ice cubes in a food processor and blend for about two minutes or until smooth. Then add the ice cubes and continue to blend for another three minutes or so. The paste should be very thick with a lot of elasticity. The finished paste should be very smooth with no solid pieces of fish. Scoop the paste into a bowl and refrigerate for about an hour before using.

And what the heck is a pollock??? I used fresh Basa. I like Basa. It is very sweet and white and NON fishy taste. Nothing I hate more than a fish that is overpowering in smells and taste. 


So basically, keep the paste in the fridge for at least an hour. Once it is chilled and firm, or when you are ready to cook them, you can use the paste in just about anything. As you can see, I have stuffed some fish paste into some red chillies like yong tau foo. You can do that with tofu, peppers, beancurd sheets, rolled into balls for noodles, it can be deepfried and serve with chilli sauce or as a snack on a stick. You can even steam it for dimsum. Boil it in soups. It is up to your imagination, the possibilities are endless. 

Mmmmmmm.... fishballs for me ;) Yippppeeeeee

Sunday, July 1, 2012

Red Velvet Cupcakes


I have been wanting to make this for a while now but the steps was too challenging and complex...okay you bakers out there... shut up! If I can burn toast, I can burn anything ;) I may not be able to bake to save my life, at least I am still trying..

So, these steps are not too hard... I think!

Credits:
Recipe is from my friend Suz @ 
http://thesuzchef.blogspot.com.au/2011/12/elmo-red-velvet-cupcakes.html


Ingredients (for 12 normal sized cupcakes or about 30 baby cakes)

60g unsalted butter - at room temperature
150g caster sugar
1 large egg, lightly beaten
10g cocoa powder
20mL red food colouring
1/2 teaspoon vanilla extract
120mL buttermilk
150g plain flour
1/2 teaspoon salt
1/2 teaspoon bicarb
1 1/2 teaspoon white wine vinegar

Frosting
300g icing sugar, sifted
50g unsalted butter - at room temperature
125g cream cheese

Ingredients

1. Preheat oven to 170 degrees Celsius and line a cupcake pan with cases.
2. Cream together the butter and the caster sugar until pale and fluffy.
3. In a small bowl, mix together the food colouring, cocoa and vanilla extract into a thick paste.
4. Add the paste to the butter and beat together until the colour is evenly mixed through, making sure to scrape down the sides.
5. On slow speed, add half the buttermilk and beat, and then add half the flour and beat for a minute or two.
6. Add the remainder of the buttermilk and flour and beat together until all combined.
7. Add the salt, bicarb and vinegar, turning up the speed and beating for a few minutes until the mixture is completely light and fluffy.
8. Spoon into the patty cases and bake for 22 minutes if normal sized cupcake and 15 for babycakes.
9. Allow the cupcakes to cool for a few minutes in the tin and then turn out onto wire rack to cool completely.
10. For the frosting, beat together the icing sugar and the butter for a few minutes. Add the cream cheese and beat on medium-high speed for a few minutes until the frosting is light and fluffy.
11. When the cupcakes are cool, frost the cupcakes and enjoy

Jackie's tips: While I was waiting for my cupcakes to bake, I started beating the frosting. I filled the piping bag full of frosting and sat it in a tall cup, in the fridge for a few minutes.


And.....voila!!! Even my furkid wants one!


Related Posts Plugin for WordPress, Blogger...